Zoom Support

Zoom is a web-based video conferencing tool with a local, desktop client and a mobile
app that allows users to meet online, with or without video.
🧭 Overview
- You will learn how to use Zoom with your Stockton account
- Best for: Students | Faculty | Staff
- Time: ~10 minutes
Prerequisites
- Active Stockton account and SSO access
- Laptop, desktop, phone, or tablet
- Webcam & Microphone
Zoom users can choose to record sessions, collaborate on projects, and share or annotate on one another's screens, all with one easy-to-use platform. Here are some of the most common Zoom inquires made from users:
Signing into Zoom Client
1.) Open Zoom on your Laptop, Phone or PC and click "SSO" below the email address and password boxes.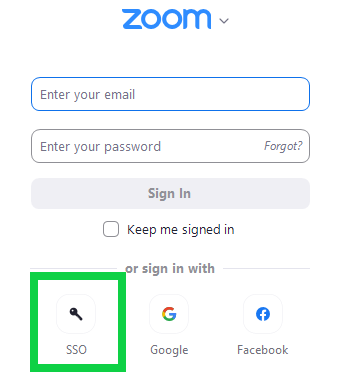
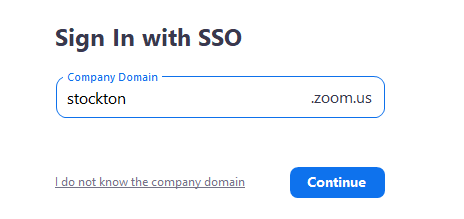
2.) Under "Company Domain," type in "stockton" and press "Continue"
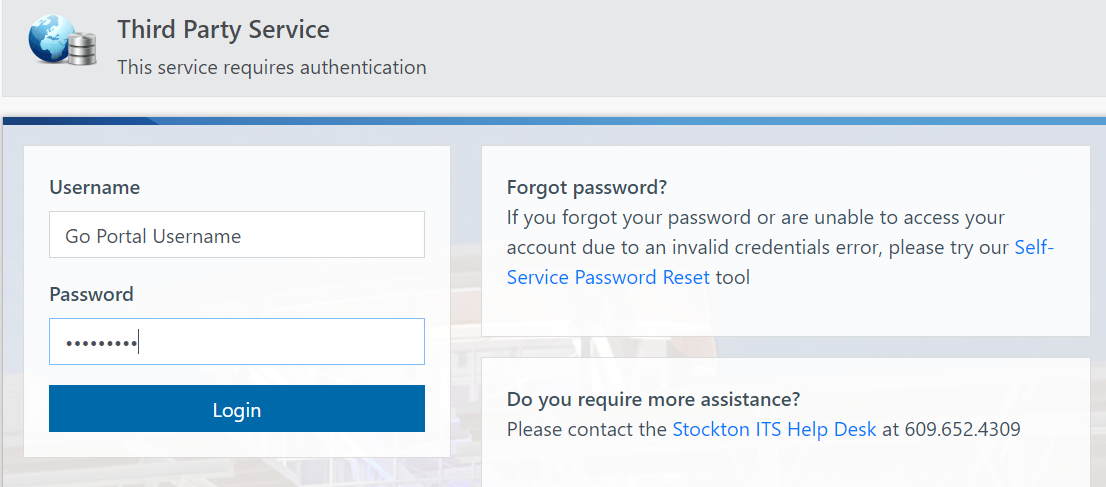
3.) Type in your Stockton Go-Portal credentials and press "Login."
If you do not know you GoPortal password, please click the "Self-Service Password Reset" button.
You will be redirected from your browser to your Zoom client. You are now logged into Zoom!
Join a Zoom Meeting
When you're ready to join a Zoom meeting, check your meeting invite for either a Join link or a Meeting ID number.
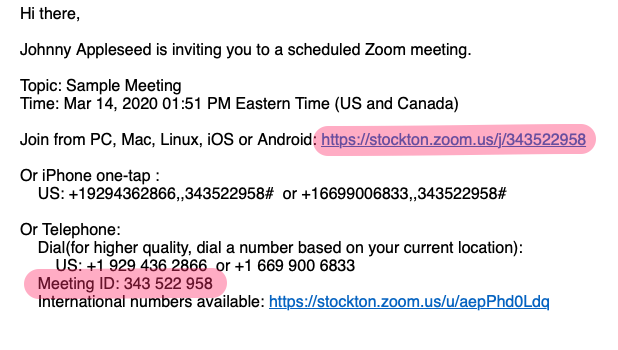
To join your meeting you may either click on the Meeting Link or copy the Meeting ID and navigate to zoom.stockton.edu, click on "Join Meeting" and paste your Meeting ID into the appropriate field.
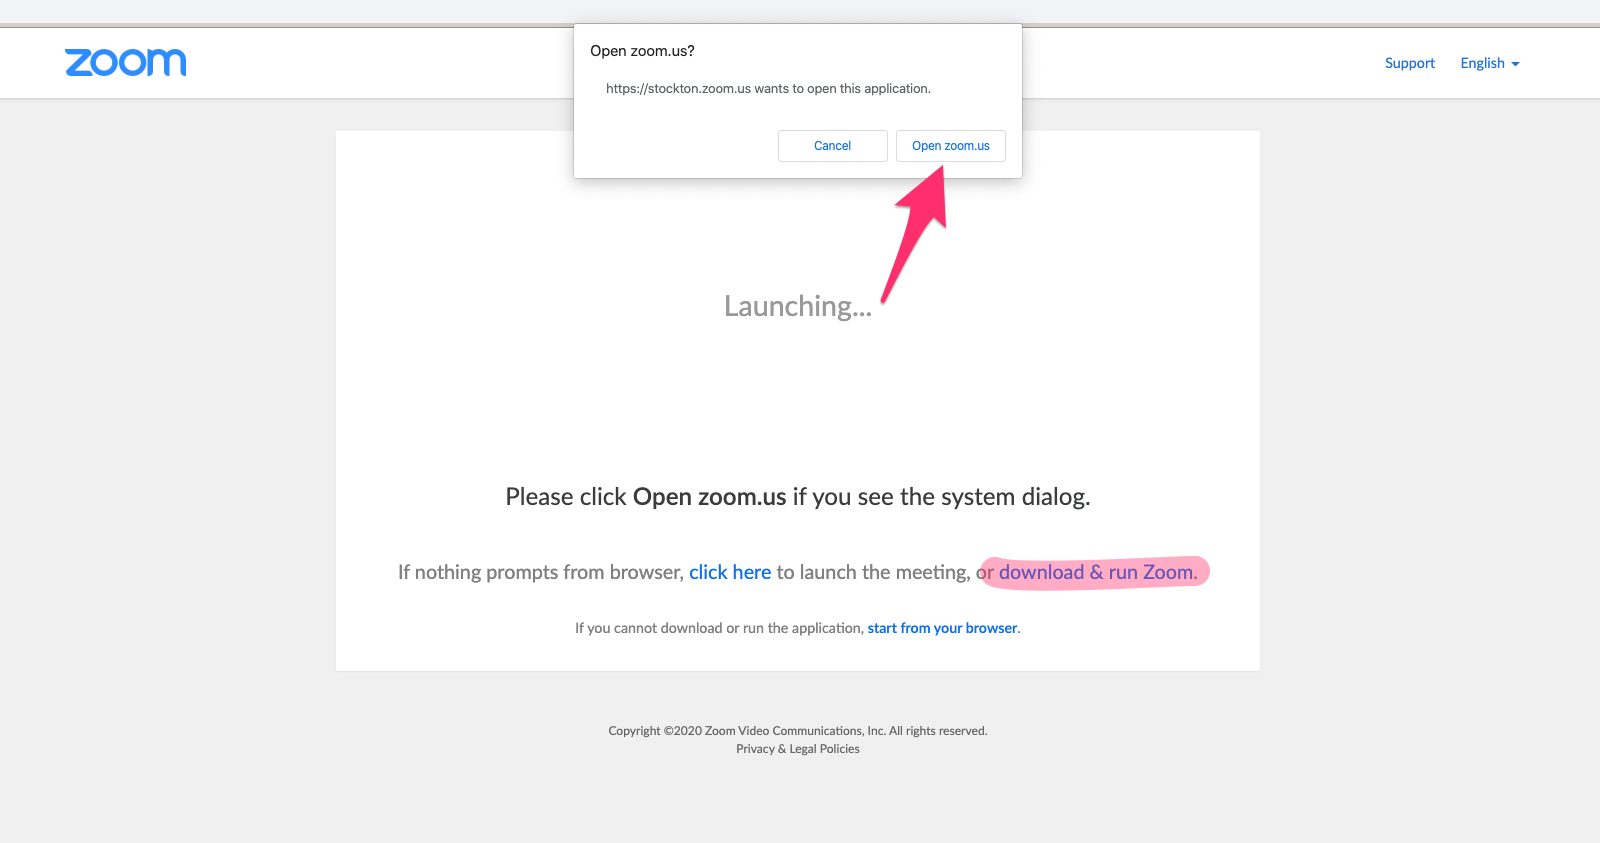
Next, you'll be presented with a web page that will either attempt to open an existing Zoom installation or will prompt you to download and install Zoom. Follow the on-screen instructions to open the Zoom client and enter your online meeting.
If this is your first time using Zoom, we suggest that you do a "dry run" with Zoom's Test Meeting - you can access the Test Meeting at https://zoom.us/test. If you encounter any issues or have any questions about accessing Zoom, please contact the IT Services Help Desk at 609-652-4309 or by e-mail at helpdesk@stockton.edu
Scheduling a Zoom Meeting
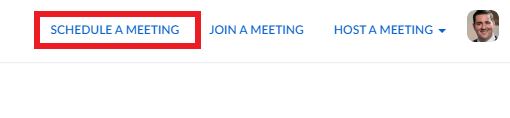
To schedule a zoom meeting, navigate to stockton.edu/zoom, login to your account, and click on the “SCHEDULE A MEETING” link in the upper left corner of the page.
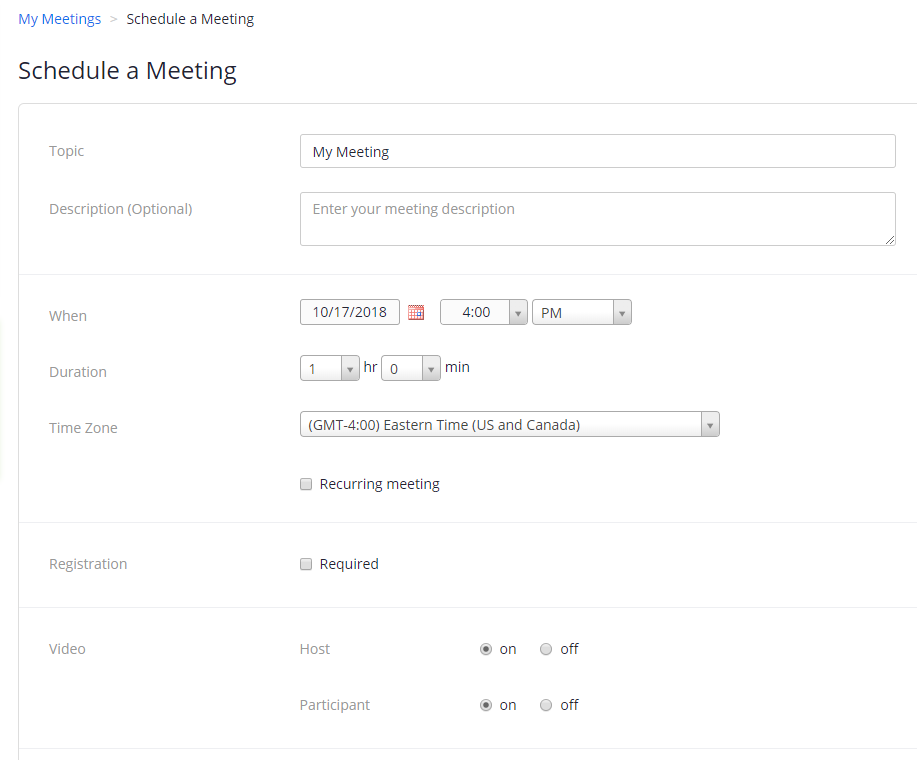
You will then be taken to a page that will allow you to fill out necessary details to schedule your meeting. Be sure to set the meeting's time zone to the appropriate location - Stockton's local time is GMT-5 "Eastern Time".
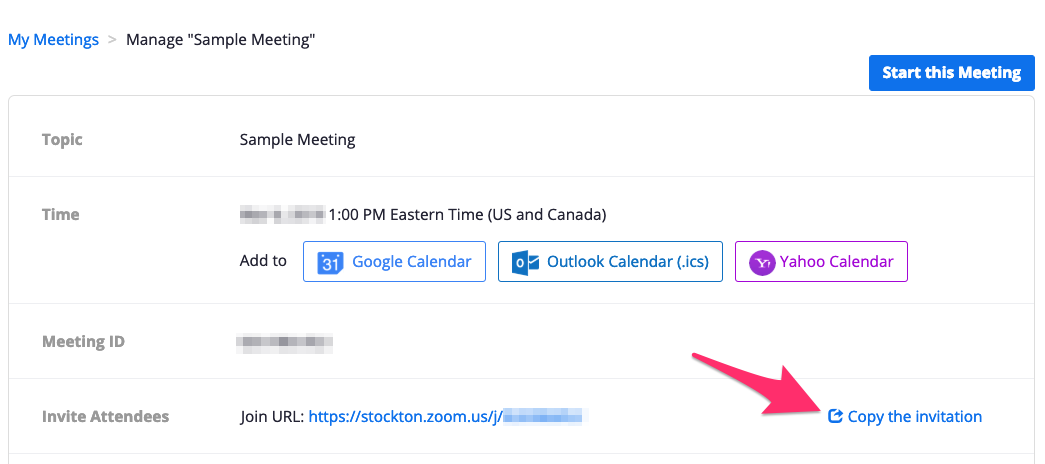
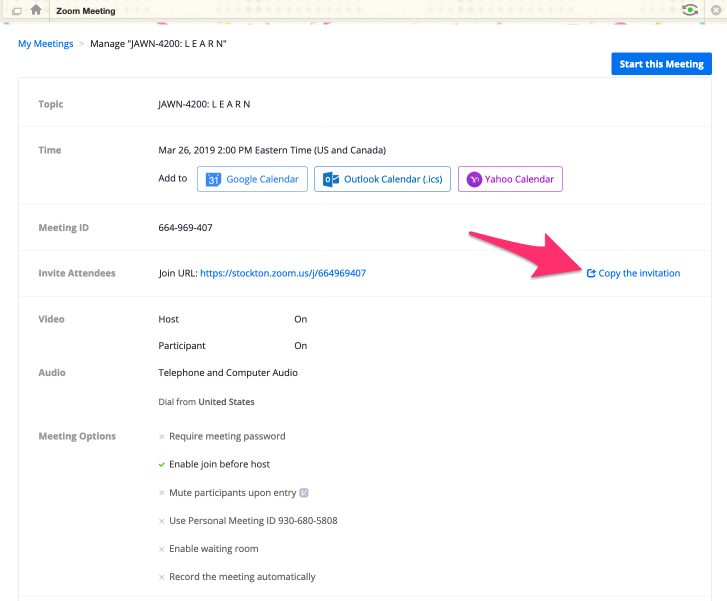
After scheduling the meeting, you will be brought to the meeting details page. From here you can add the meeting to your Outlook calendar and invite attendees. To invite attendees, click on the "Copy the Invitation" link; the resulting pop-up window will contain a template that can be copied and e-mailed to attendees.
Please see the video HERE for a detailed step by step process on how to schedule a meeting.
Hosting a Zoom Meeting in Blackboard
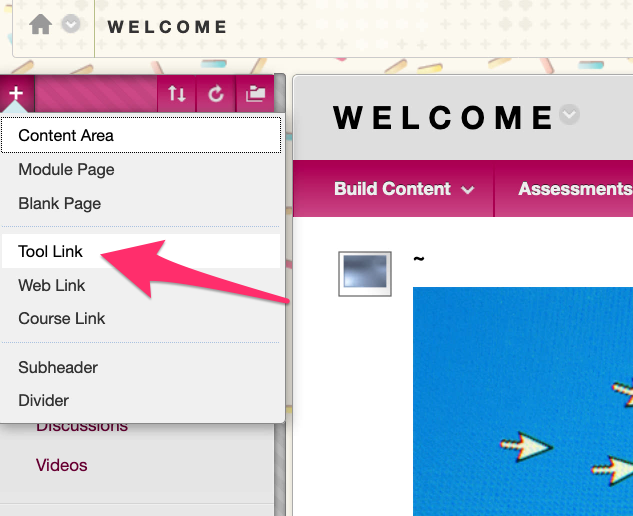
To begin, open up your web browser and navigate to your Blackboard course section. Click on the + icon at the top of the course navigation menu and select the option “Tool Link”.
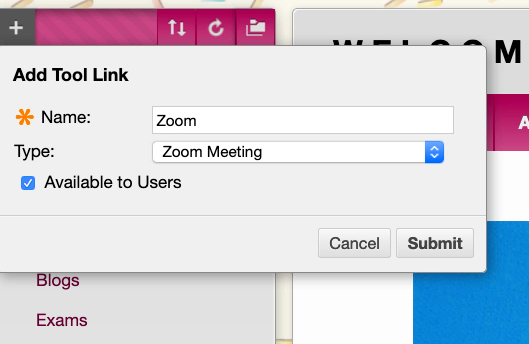
Next, give the new Tool Link a name (ex. “Zoom”), choose the tool type “Zoom Meeting” from the drop-drown menu, and check the box “Available to Users”.
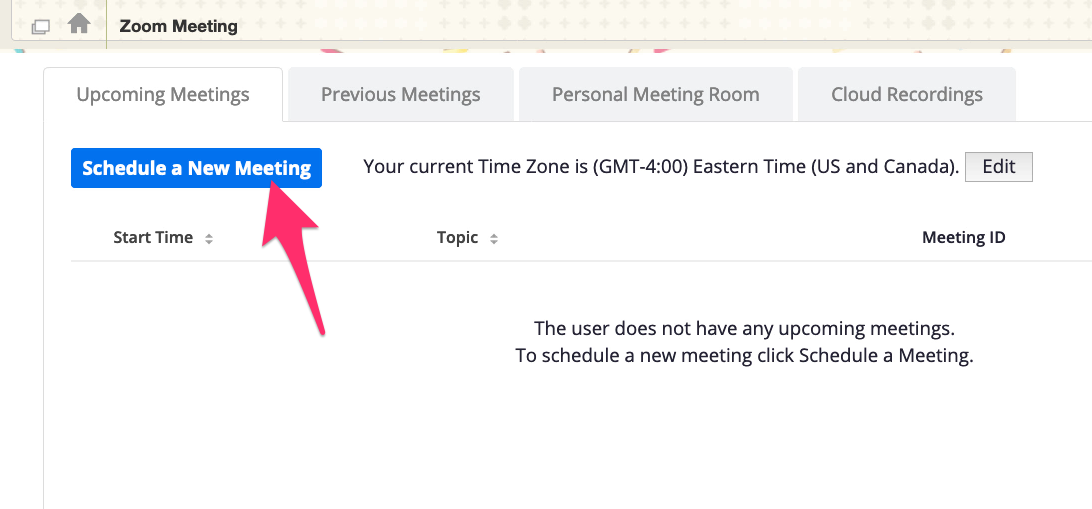
A new link will be available in your course menu, click on it to navigate to the Zoom tool. This interface may be familiar to those who have already logged into Zoom through the zoom.stockton.edu page. To create a Zoom meeting, click on “Schedule a New Meeting”.
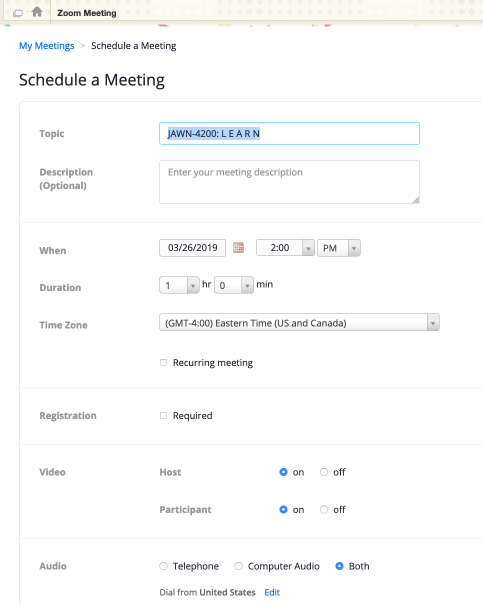
Give your Zoom meeting a topic that matches its purpose, then modify any necessary date and time settings. To finalize the meeting, scroll down and click “Save”.
To invite students and guests to the meeting, click on “Copy the Invitation” to generate a complete e-mail template with all relevant meeting details. This template can be pasted into an e-mail or Blackboard announcement for distribution.
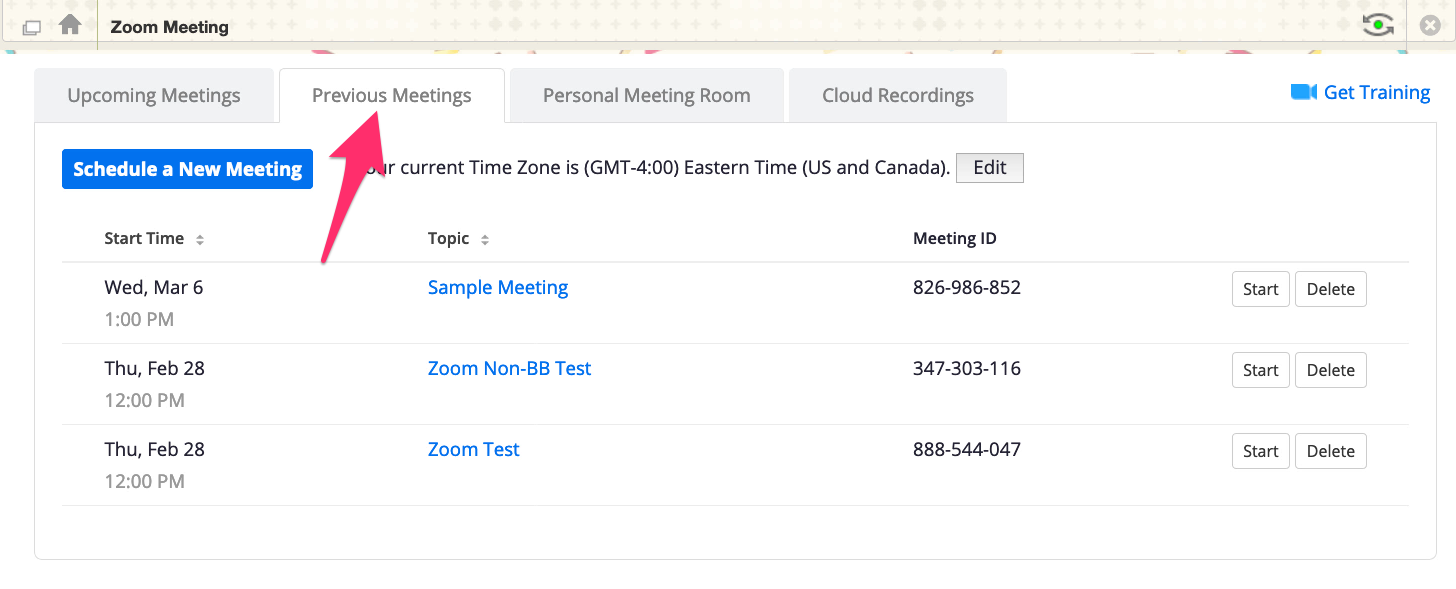
Back in the main menu, there are two useful tabs that bear mentioning: “Previous Meetings”, which encompasses all previous meetings attached to your account...
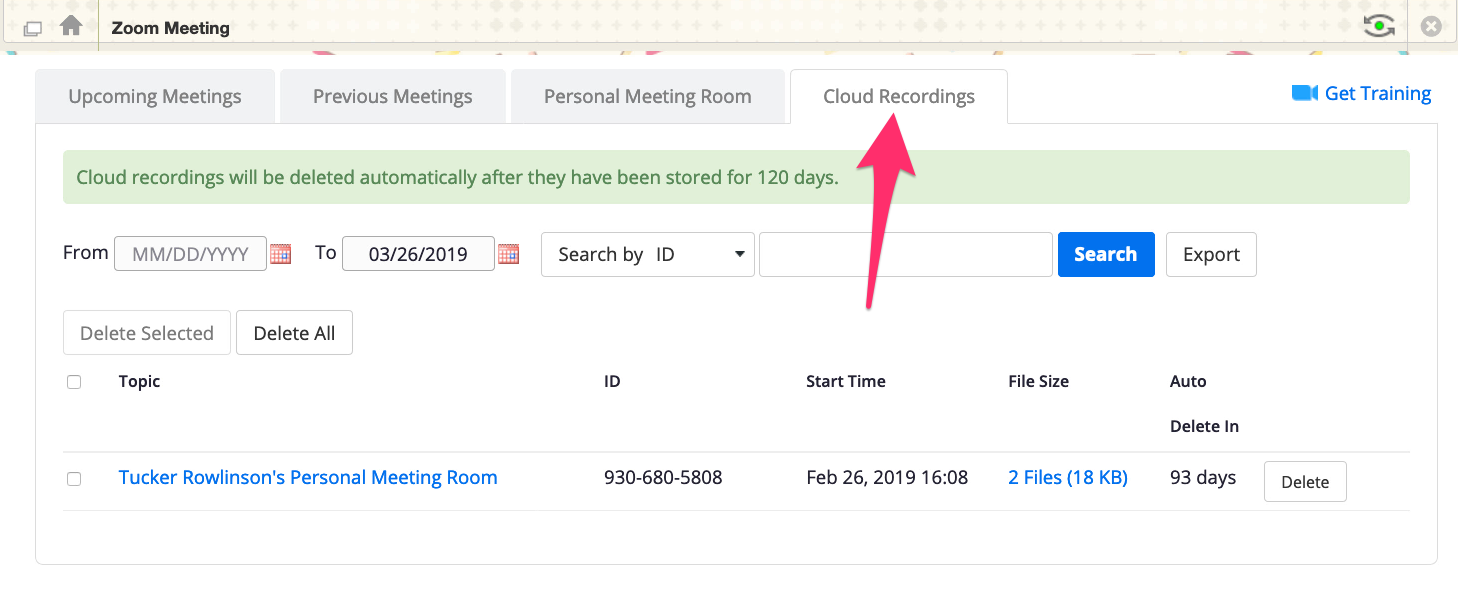
You will also find “Cloud Recordings” where meeting recordings are stored and can be downloaded for 120 days.
For additional information on Zoom, check out Zoom’s online help center.
Making Sure Everyone is Heard
When joining your meeting, you’ll have the ability to select your audio source and test your microphone and speakers.
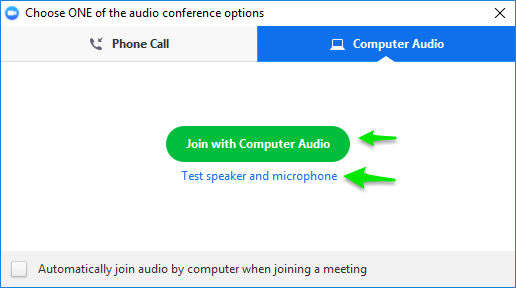
As a host, you can also mute incoming participants. 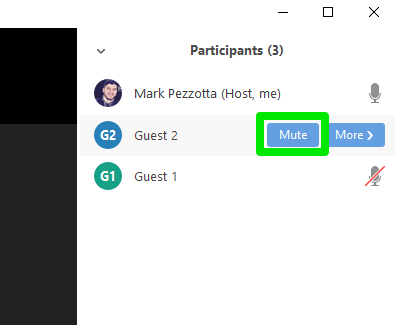
For more details on how to adjust your audio levels see the video HERE on how to setup your sound for a Zoom meeting.
How to Record a Meeting
To record a zoom meeting toggle the record button at the bottom of the window. 
See the video HERE for a detailed overview on how to record Zoom meetings.
How to Locally Record a Meeting and Upload to Blackboard
To record locally:
- Start a Zoom meeting as the host.
- Click the option to Record.

- If there is a menu, select Record on this Computer.
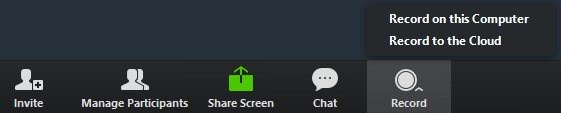
Note: Dial-in participants will hear a message informing them that the meeting is now being recorded unless disabled by the host. - After the meeting has ended, Zoom will convert the recording so you can access the
files.
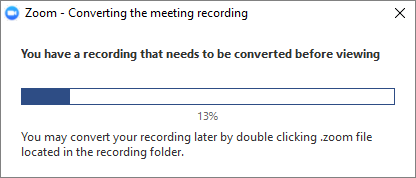
- Once the conversion process is complete, the folder containing the recording files
will open.
Note: By default, the audio/video file (MP4) will be named Zoom_0.mp4. The audio only file (M4A) is named audio_only.m4a.
To access recording files:
By default, all recordings will be placed in a Zoom folder found in the following file path on these devices:
- PC: C:\Users\UserName\Documents\Zoom
- Mac: /Users/UserName/Documents/Zoom
- Open the Zoom desktop client and click Meetings.

- Click the Recorded tab and select the meeting with a local recording.
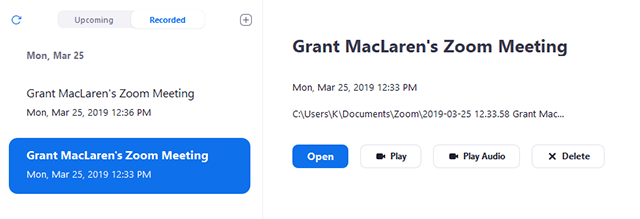
Note:- If you have a local recording that hasn't been converted to a video file yet, click Convert to convert the recording to a video file and display the options below.
- If you only see the Open option, it means the recording is a cloud recording.
To Upload to Blackboard
- Follow the steps outlined here, on Stockton's Blackboard Tutorial site.
Sending Invites to Meeting Participants
When scheduling a meeting you can email the participants the information, alternatively you can also invite new participants while in the meeting using the invite button.
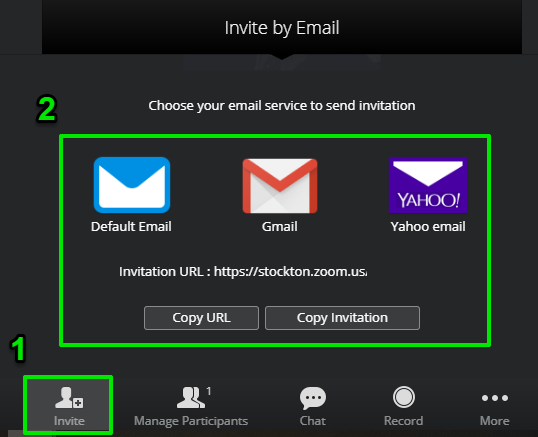
For more details information please see the video HERE on how to invite participants to zoom meetings.
Tips for Hosting a Successful Video Conference
Video conferencing is a versatile tool to host synchronous discussions, whether for
a meeting, a class, or catching up with friends. These quick and easy steps will help
you conduct a smooth and productive video meeting.
Mute yourself when not speaking
Minimize interruptions
Reduce or remove distracting imagery
Stockton University provides a selection of neutral background images to use in your video conference.
Wear headphones
Headphones help to isolate sound, simultaneously making it easier to hear other participants and preventing microphone feedback. A headphone-microphone set is particularly useful for video calls, as it keeps the microphone closer to your mouth to improve audio clarity.
Don’t talk over other participants
Be an active host
Not all participants will follow rules or video conference etiquette. Hosts have the ability to mute or remove participants who are disruptive.
Meetings vs Webinars
Though Zoom Meetings and Zoom Webinars provide comparable features, there are some differences to be aware of when deciding which tool best suits your need. Below you will find a key feature comparison and a use case comparison chart.
| Zoom Meetings | Zoom Webinars |
|---|---|
| Participant limit: 300 | Participant limit: 500 or 1000 |
| Content Sharing: All Participants | Content Sharing: Host, Co-host, and Panelists Only |
| Audio & Video: All Participants | Audio & Video: Host, Co-host, and Panelist Only |
|
Chat: Host to All Participants and Participant to Participant Privately and Publicly. (Hosts have the ability to disable Public and Private Chat.) |
Chat: Hosts, Co-hosts, Panelists, and Participants can publicly. (Hosts have the ability to disable chat completely for participants.) |
| Polling: Available | Polling: Available |
| Breakout Rooms: Available | Breakout Rooms: Not available |
| Q&A: Not available | Q&A: Available |
| Livestream: Not available | Livestream: Available with some restrictions. |
Use of Zoom meetings or webinars should also be considered based on the experience you want to provide for your participants. Meetings are more interactive and provide different ways for participants to engage. Webinars provide the host the opportunity to have full control over presenting to a very large group with full permissions to manage the webinar, panelists, and attendees.
| Use Case | Considerations | Solution |
|---|---|---|
| Staff meeting | Less than 300 participants, video and audio of all participants, and ability to content share. More participant engagement. | Meeting |
| Training session | With less than 300 participants, breakout rooms are an option as well as polling. Includes a Raise Hand feature that is ideal for training sessions. The host can mute all participants and toggle on when appropriate to allow for interaction. | Meeting |
| Professional conference |
More than 300 participants, more control for the host, co-host, and panelist. Audio, video, and content are shared by the host, co-host, and panelist only. Includes polling feature, which is often utilized for professional conferences. |
Webinar |
| Class under 300 | Ideal for interactive sessions where you’ll want to have lots of audience participation or utilize breakout sessions for small group discussions. | Meeting |
| Class over 300 | A virtual lecture hall or auditorium with a very large audience. Ability to use Q&A feature for attendees to ask questions during class. | Webinar |
| Patient visit | May be used with some types of sensitive data, including Protected Health Information (PHI), and provides end-to-end encryption. Ability to lock meetings. | Meeting |
| Daily stand-up | Ability to see all participants. Everyone has audio and video and can chat publicly or privately. | Meeting |
| Town Hall | Large audience/event that is open to the public and needs little audience engagement. | Webinar |
Click here for additional information from Zoom on the feature differences between Meetings and Webinars.
Webinar Request Form
Using Live Transcriptions During your Meeting or Webinar
Zoom offers the ability to provide live automatic speech recognition (ASR) transcripts in real time for meetings and webinars. The feature provides the ability to show in-session ASR transcriptions of all spoken content, based on the session audio. Transcriptions appear during the meeting or webinar in a side panel visible to all participants. Click here for more info!
Assigning Scheduling Privileges in Zoom
As with Outlook calendars, sometimes it is necessary to schedule meetings for another Stockton community member. This functionality is built-in, but it must be enabled by individual account holders.
To designate a person as a schedule for your Zoom meetings, first log into your Zoom profile at zoom.stockton.edu. Go to “Settings”, “Other”, and then “Schedule Privilege”.
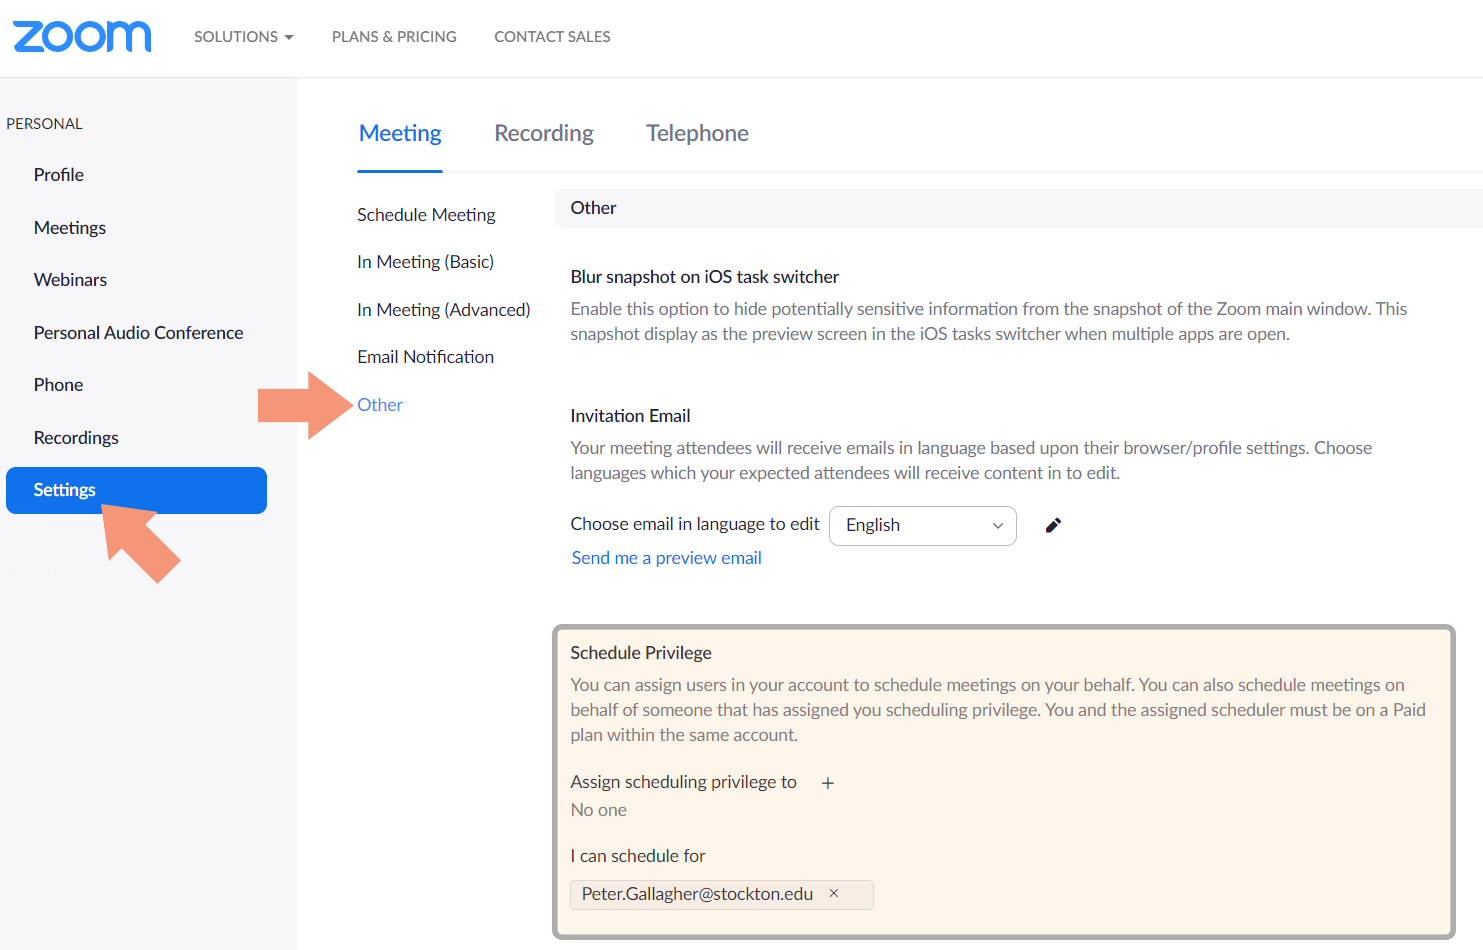
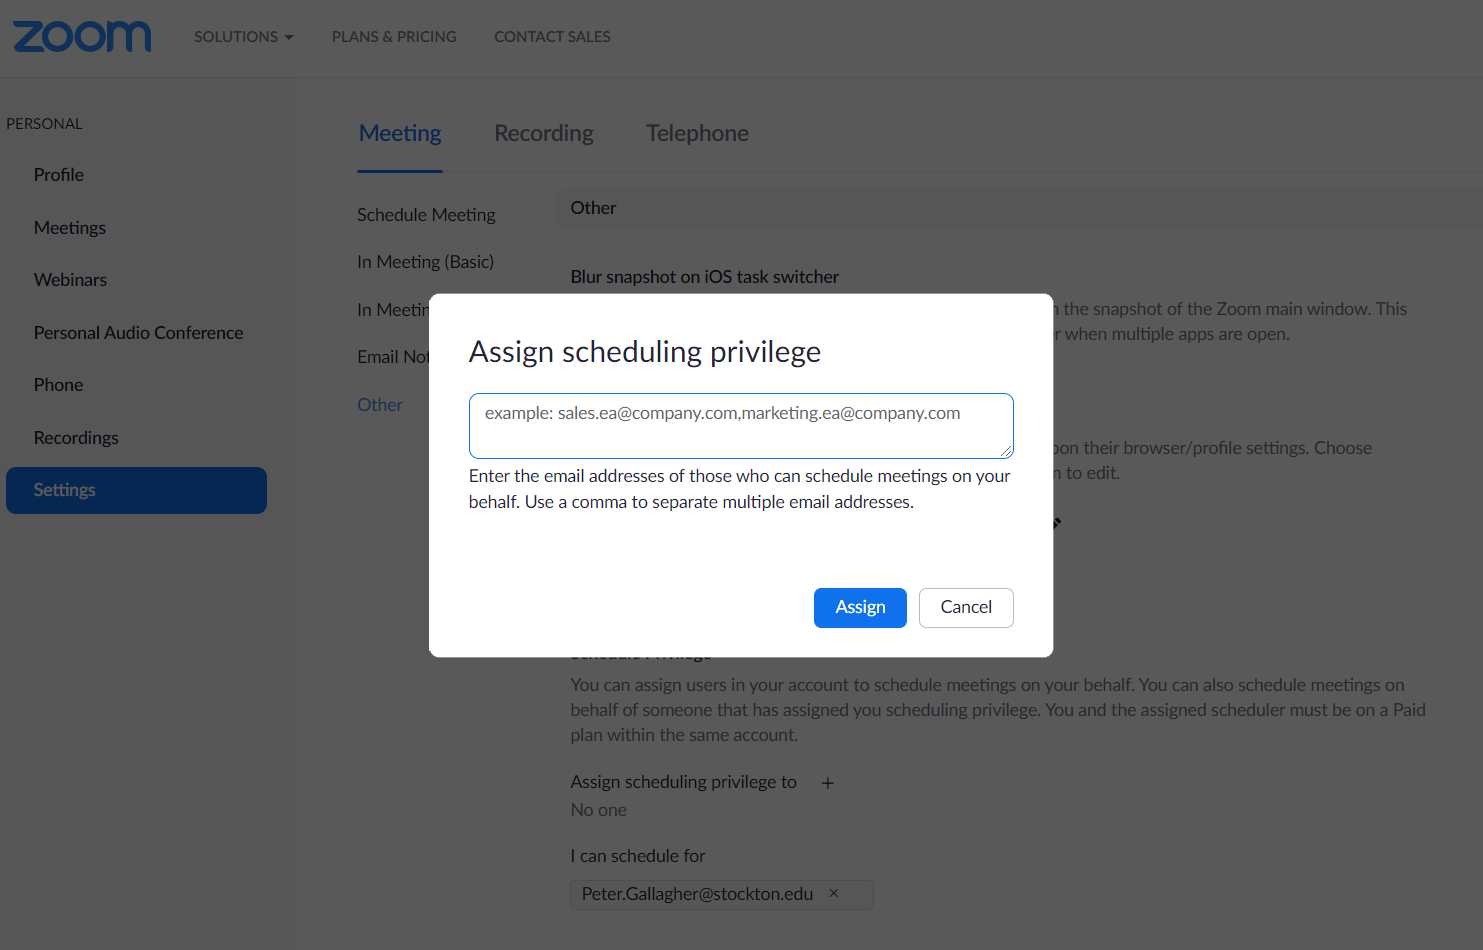
Click on “Assign scheduling privilege to” to designate someone who may create Zoom meetings for you. Under “I can schedule for” you can view a list of all users currently authorized to create meetings on your behalf.
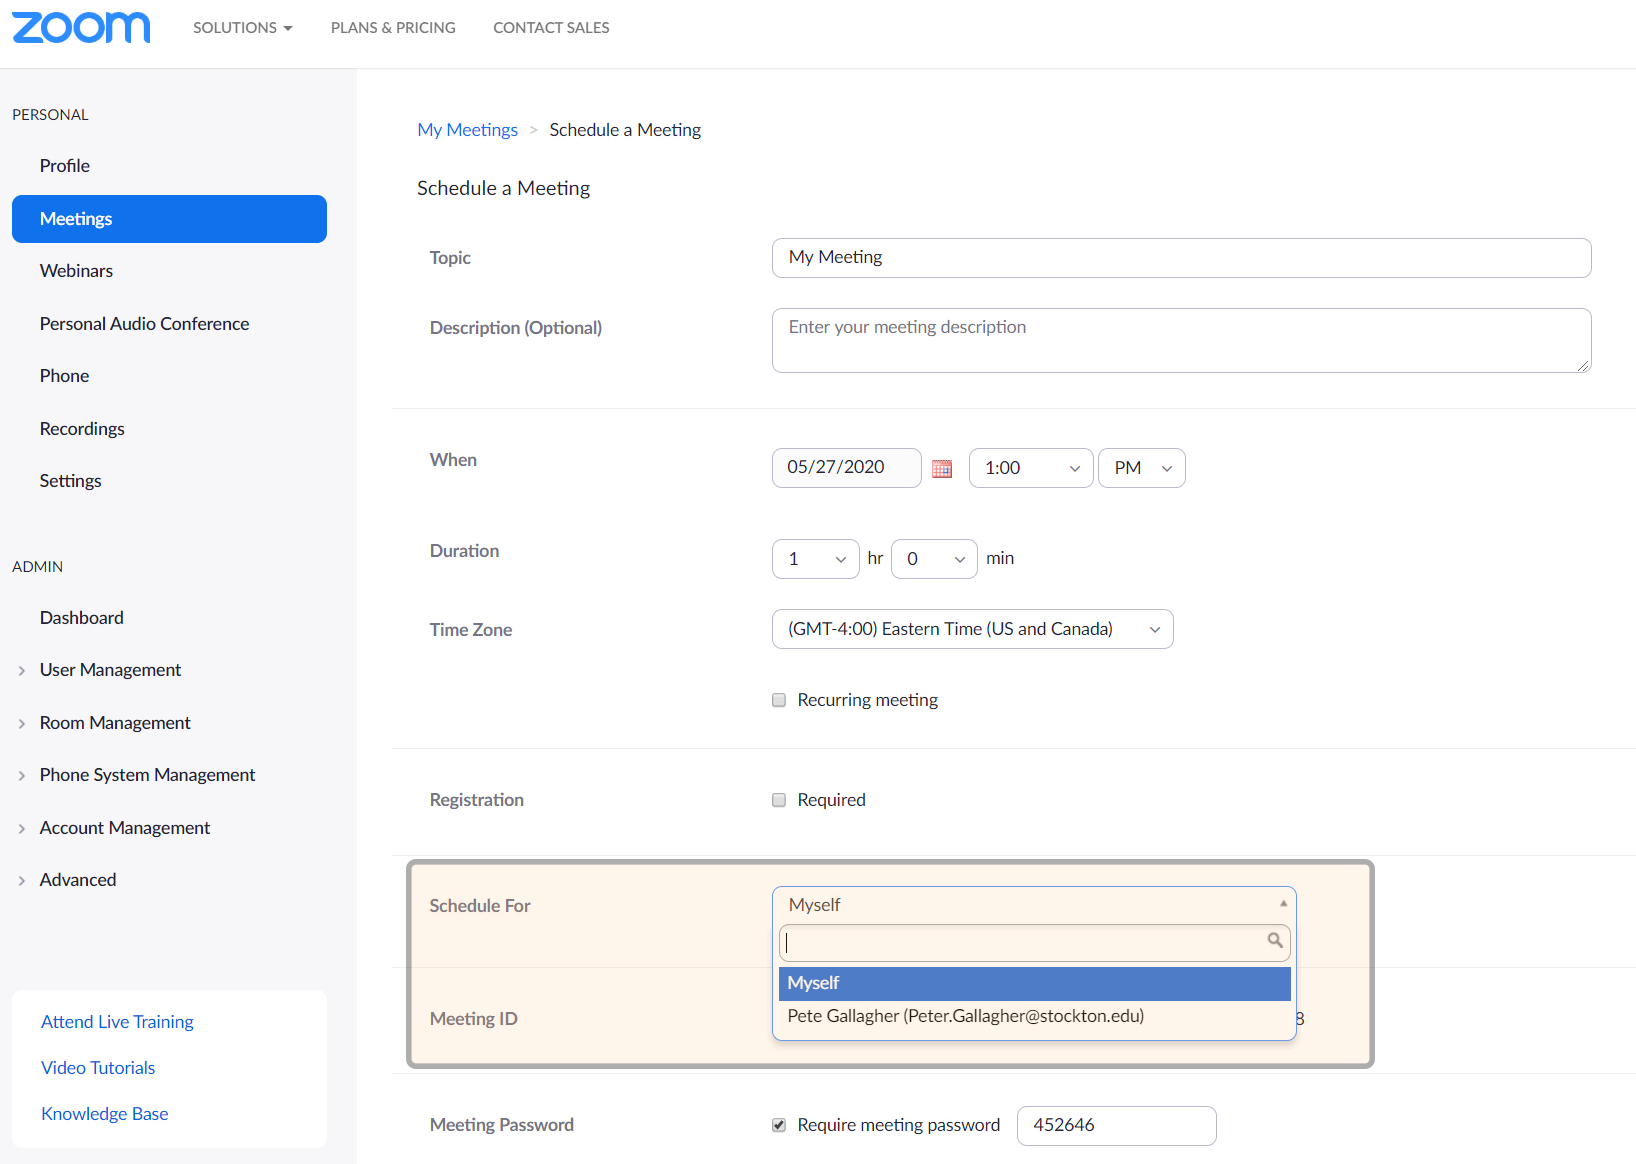
If you have been designated to create meetings for another Stockton community member, you can do so as if you were scheduling a normal meeting. Under the “Schedule For” setting, you may choose from a list of users you are authorized to schedule for.
Once you’ve chosen a user, proceed to create a meeting as you normally would.
Meetings created in this way can be edited later by both the named user and the assigned scheduler.
️ Don't Zoom & Drive
Joining a Zoom meeting while operating a motor vehicle is dangerous and illegal. Review New Jersey's distracted driving law (N.J.S.A. 39:4-97.3) and Campus Police resources.
Get help
- Phone: 609‑652‑4309
- ️ Email: helpdesk@stockton.edu
- 🧾 Submit a ticket