Ospreys Navigate Tools & Resources
Ospreys Navigate Overview
Tutorials and Quick Reference
Welcome to the Ospreys Navigate Help Resource Center. This webpage supports Stockton University faculty and staff in effectively using our student success management platform to provide comprehensive student support across campus. The page is organized into three key sections: General Tutorials covering basic platform functions, Appointment Tutorials for scheduling and managing student meetings, and Trainings for professional development. These resources will help you maximize Ospreys Navigate's potential to support student success at Stockton University.
Click any blue button throughout this page to open interactive step-by-step guides. Use the ↗ button in the bottom right corner of the pop-up to view the complete document and scroll through the guide in a new tab.
General Tutorials
- Overview Presentation (to be added shortly)- A comprehensive introduction to Ospreys Navigate, covering key features, navigation, and best practices for faculty and staff.
- General Ospreys Navigate Terminology- Essential definitions and explanations of platform-specific terms and language used throughout the system.
- Guidelines for FERPA Compliant Notes- Best practices for writing student notes while maintaining compliance with Family Educational Rights and Privacy Act requirements.
FERPA
For a brief overview on FERPA guidelines with taking notes on students, click here.
General Ospreys Navigate Terminology
Click here to download the terminology as a PDF.
Ospreys Navigate is a FERPA-compliant student success management platform that helps coordinate student support services. The system enables faculty and staff to track, support, and provide timely interventions to promote student success.
Maxient is a secure records management system that helps track and manage student conduct and well-being cases while complying with federal privacy laws (FERPA). It’s used by Stockton Cares and other offices to maintain non-academic student records.
Care Unit- Offices/groups across campus (Financial Aid, Academic Advising, Career Center, Academic Schools, Tutoring, etc.)
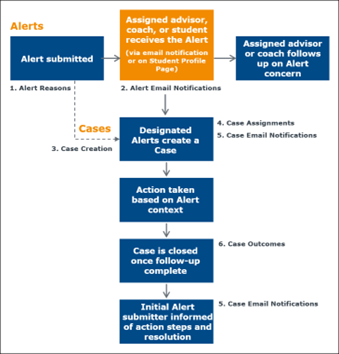
Alerts serve as an early warning system to identify students who might need additional support or attention. When faculty or staff notice potential concerns during their interactions with students, they can issue alerts to flag these situations.
- Students can be flagged for various reasons, such as risk of losing financial aid, need for academic support through tutoring, or expressing intentions to withdraw from the institution. It's important to understand that raising an alert doesn't automatically trigger formal action or the opening of a case - it simply helps identify students who might need attention.
- However, in cases where more structured support is needed, certain alerts will initiate a case management process. These cases are then directed to specific departments or staff members who will follow up with appropriate interventions and support services.
A Case is an electronic case file where staff across departments (e.g., financial aid, bursar, tutoring, counseling) can coordinate and collaborate on the follow up with the student. Cases create a formalized next step for action or intervention on the issued Alert, should that be needed.
- Warning! Any information you enter into the Ospreys Navigate platform pertaining to a student becomes a part of their official student record and may be subpoenaed by that student, as outlined in the Family Educational Rights and Privacy Act (FERPA).
Appointment Campaigns is a scheduling tool in Ospreys Navigate that streamlines meeting coordination between faculty/staff and students. Faculty can set specific criteria like availability, location, and appointment duration, while using Advanced Search to target specific student groups. For Preceptors, this tool is especially valuable as it tracks preceptee scheduling status, sends automatic reminders to students who haven't made appointments, and syncs with your calendar to prevent double-booking during classes or other commitments.
My Availability/Availability lets faculty/staff indicate the days, times, locations, and services they offer when they meet with students.
- Note: To create an Appointment Campaign you MUST have your availability updated in Ospreys Navigate and your calendar synced.
Landing Pages Information
You can access Ospreys Navigate using your goPortal credentials.
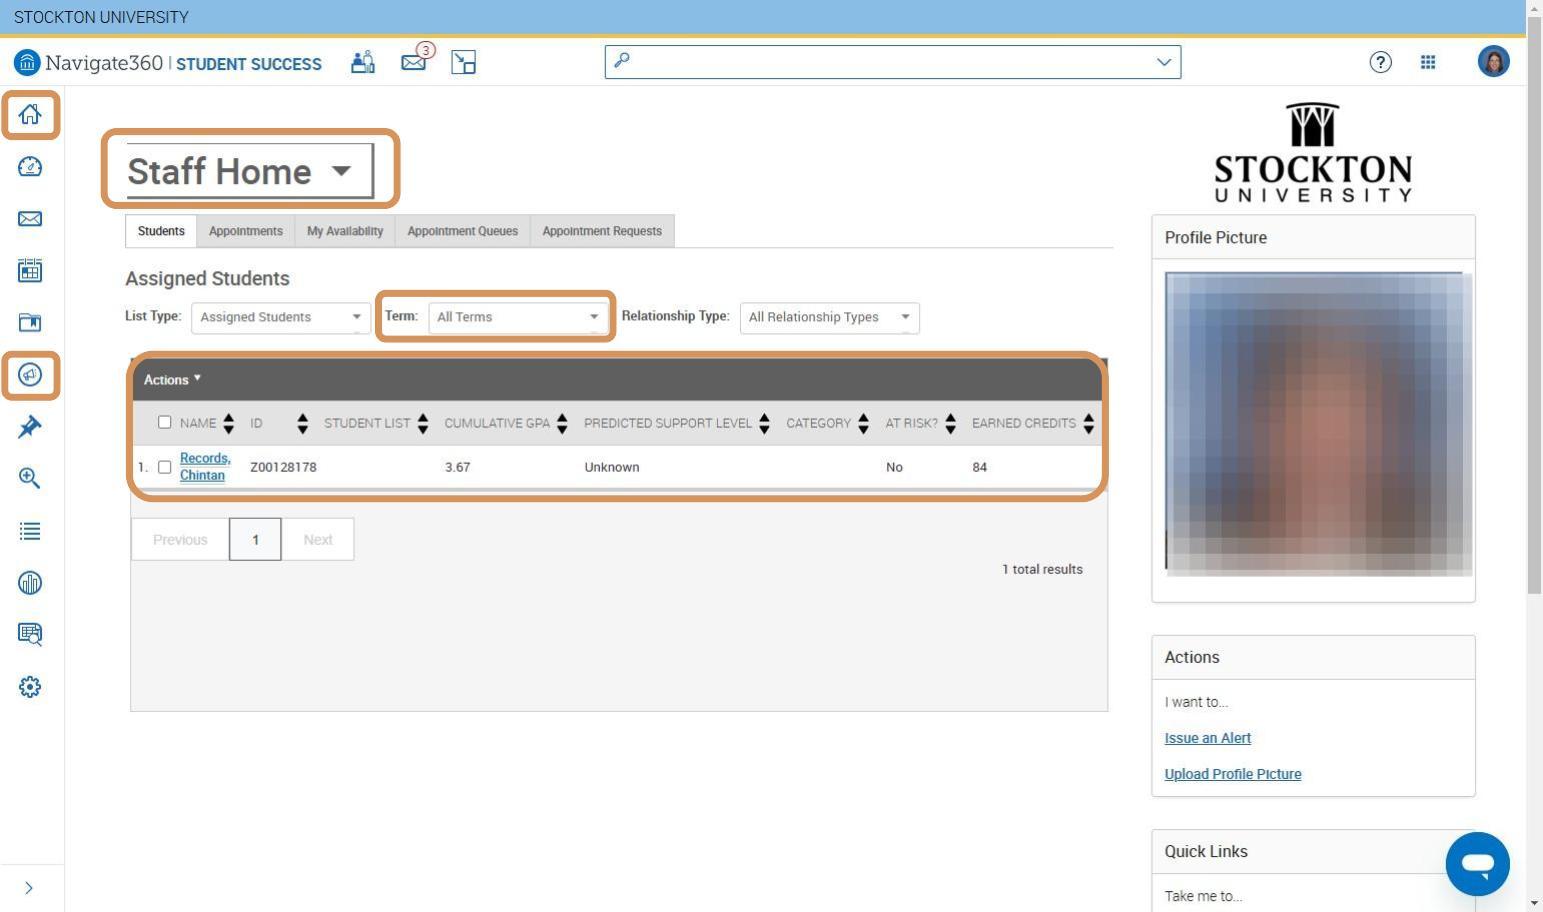
While you may have multiple roles in the system, when you log in as a Preceptor, you'll land on a page labeled "Staff Home" (this is Navigate's term for the Precepting home page).
Viewing and Managing Students:
- Under "Assigned Students," you'll find a list of your students
- Use the filters to customize your view
- Make sure to select the current semester in the "Default Term" dropdown
Taking Actions:
- Select students by checking the box next to their name
- Use the "Actions" dropdown menu at the top to perform various functions
Important Navigation Elements:
- Home button (house icon): Returns you to the landing page
- Campaigns button (megaphone icon): Accesses the campaigns feature
Semester Overview:
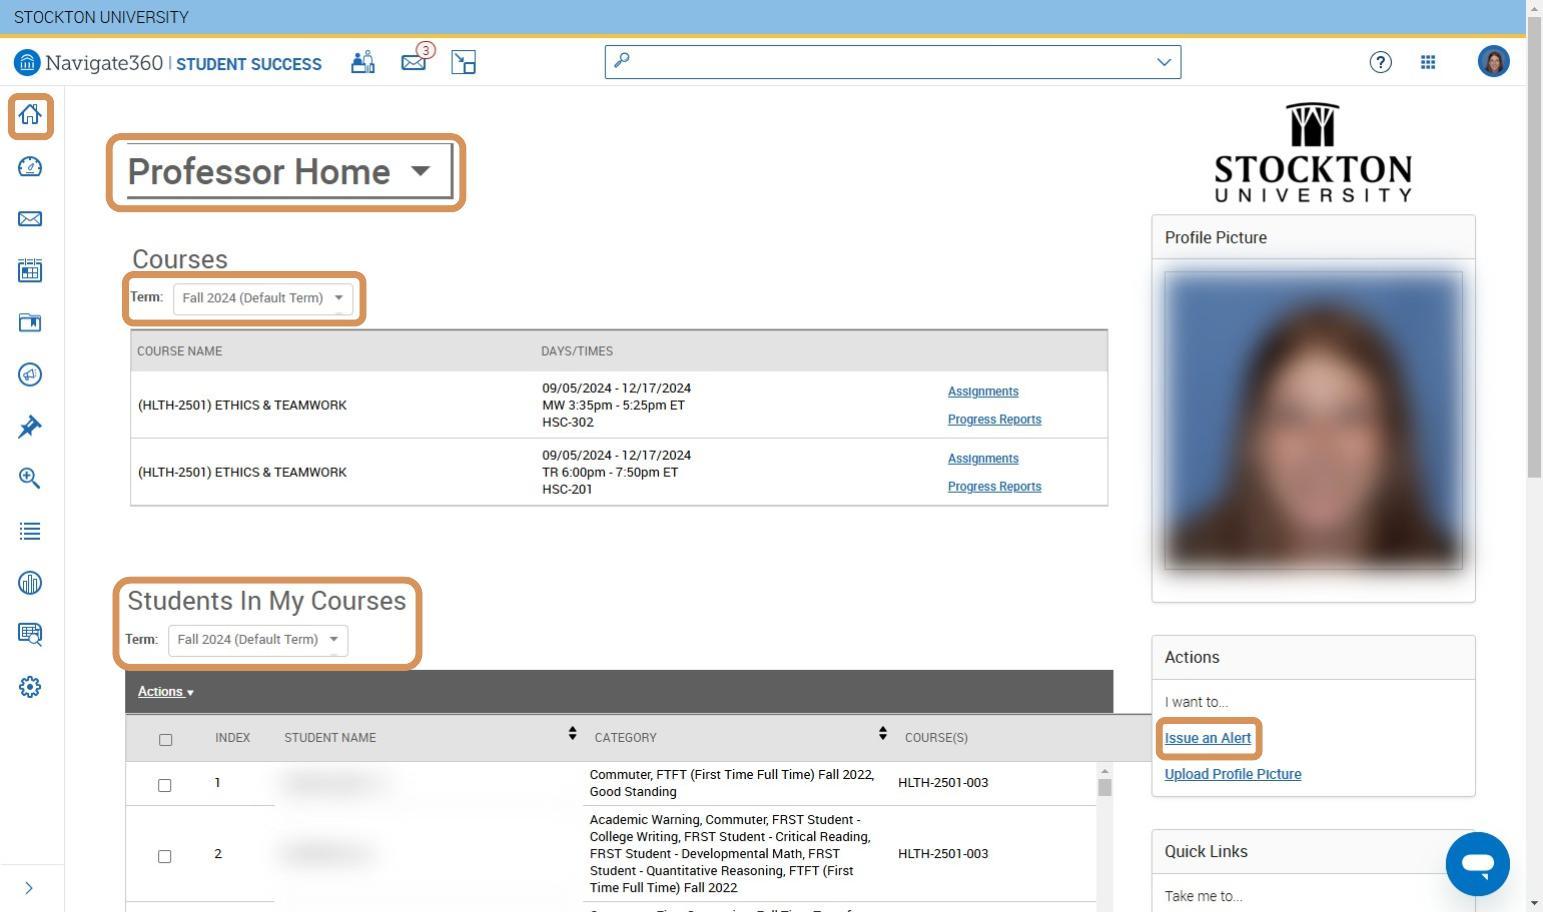
When you land on the Professor Home page, you'll see your current semester at a glance. Always verify you're viewing the correct semester in the "Default Term" setting.
Course Information:
- Displays all courses you're teaching in the selected semester
Students in My Courses:
- You'll find a complete list of your enrolled students
- Students are listed alphabetically by last name
- Only active enrollments are shown
Reporting Student Concerns:
If you need to report a concern about a student outside of the Mid-Semester Feedback campaign period:
- Select "Issue an Alert"
- This creates an Ad Hoc alert
- The system will automatically connect the student with appropriate resources and support
Faculty members with Preceptor or Professor roles can search for any student using the search menu located at the top of the screen. You can search using either:
- Student's first and last name
- Z number
Upon accessing a student's profile, you'll see a comprehensive overview that includes:
- Their current academic standing
- Any active cases or alerts
- A record of their campus meetings and appointments
- Their support team members, including:
- Assigned preceptor
- Current semester professors
- Additional academic advisors
Located beneath the student's photo, you'll find the quick action menu where you can take various actions related to that student.

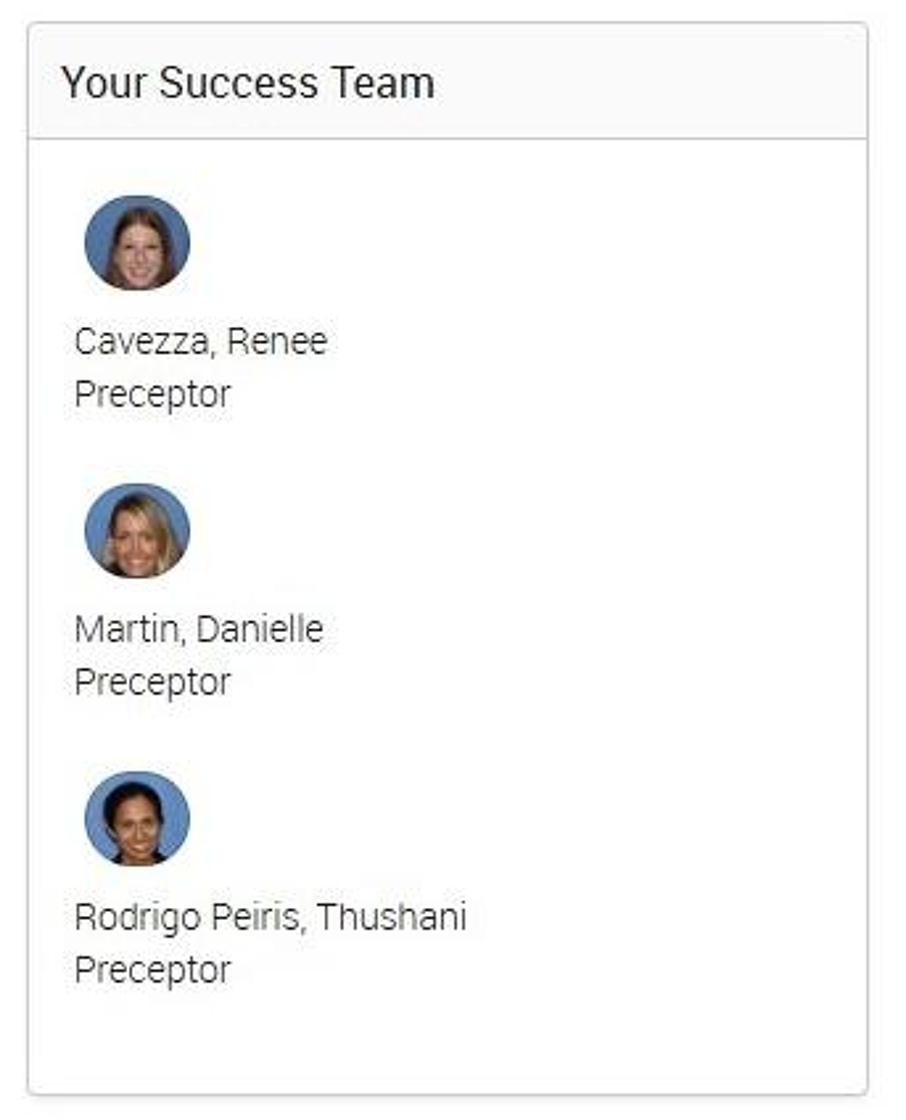
Further down the page, you'll find the student's success team. This team typically consists of:
- The student's assigned preceptor
- Current semester professors
- Additional support staff working with the student
The History tab displays:
- To Do items assigned to the student by faculty or staff
- All Alerts and Cases, with their detailed information

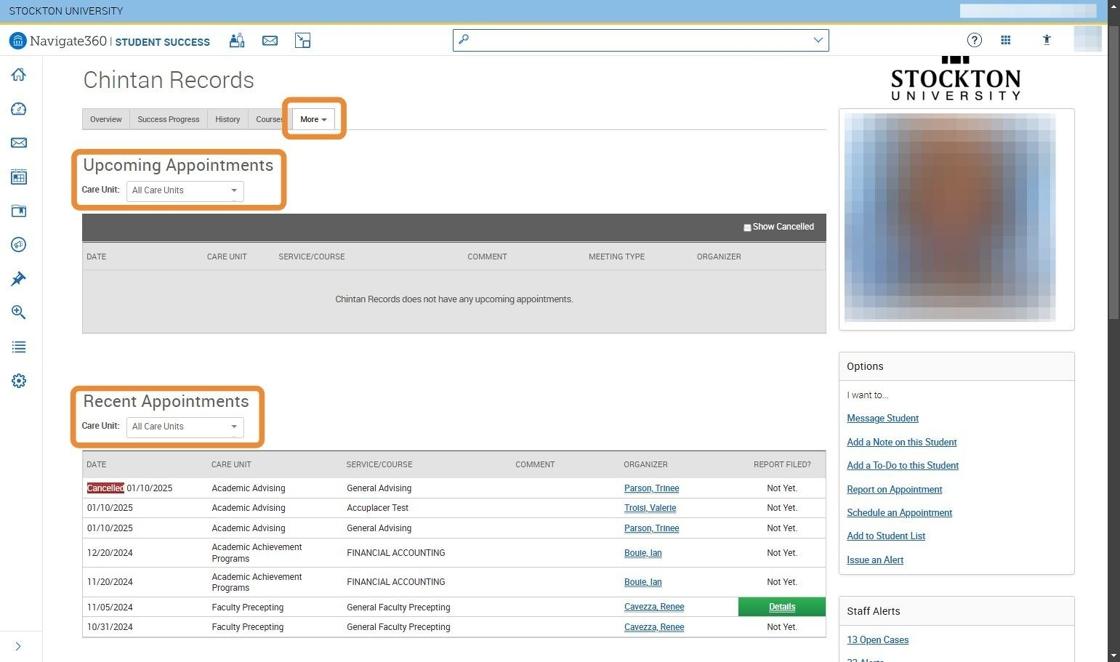
The Appointments tab, found under More, shows all of the student's appointments - both upcoming and past. For appointments where notes were taken, you can select the Details button next to that specific appointment to review the session notes.
BCSSE Advising Reports
What is BCSSE? The Beginning College Survey of Student Engagement (BCSSE) is completed by incoming undergraduate students during orientation. It captures their prior academic and co-curricular experiences, plus their expectations for their first year at Stockton.
- Go to the student's profile
- Select the History tab
- Click on Notes
Accessing the BCSSE Survey
Student Profile in Ospreys Navigate
Accessing the BCSSE Advising Sheet
- First-Year Student Advising Report: For students who graduated high school within the past two years
- Transfer Student Advising Report: For students who graduated high school three or more years ago or who are new transfer students
- Initiating conversations about academic preparedness and social adjustment
- Understanding student expectations and how they evolve throughout the term
Alerts and Cases
Alerts
Alerts serve as an early warning system to identify students who might need additional support or attention. When faculty or staff notice potential concerns during their interactions with students, they can issue alerts to flag these situations.
Students can be flagged for various reasons, such as risk of losing financial aid, need for academic support through tutoring, or expressing intentions to withdraw from the institution. It's important to understand that raising an alert doesn't automatically trigger formal action - it simply helps identify students who might need attention.
How to Issue an Alert in Ospreys Navigate
Cases
A Case is an electronic case file where staff across departments (e.g., financial aid, bursar, tutoring, counseling) can coordinate and collaborate on the follow up with the student. Cases create a formalized next step for action or intervention on the issued Alert, should that be needed.
However, in cases where more structured support is needed, certain alerts will initiate a case management process. These cases are then directed to specific departments or staff members who will follow up with appropriate interventions and support services.
How to View and Comment on a CaseMid-Semester Feedback
Mid-semester feedback is your opportunity to report on students' progress in their classes. Ospreys Navigate uses Progress Reports to collect Mid-Semester Feedback.
How to Submit a Progress Report through the Ospreys Navigate Professor Page
Please note that students do not have access to view their Mid-Semester Feedback directly. The only communication students receive is a standardized email that links them to available academic resources. This email does not contain any specific feedback or information about their standing in your course.
Viewing Mid-Semester Feedback on your PrecepteesCommunicating with Students via Ospreys Navigate
Ospreys Navigate provides both email and text messaging for faculty and staff to communicate with students, either individually or en masse. Communicating with students through the platform creates records of those communication which can be accessible by other staff or faculty on your campus. In addition, it allows for a quick and easy way to communicate with more than one student at once.
You can include the following information in an email. Note that you can also apply a Content Template to your email.
- Subject
- The subject line for your email message.
- Message
- The body of your email message. There is no character limit for the message, but any hyperlinks must include the full URL (e.g. http://www.google.com, not just google.com). You may add images, merge tags, and rich text formatting to the message.
- Add Attachment
- Upload or drag and drop attachments to the email message.
- Send Additional E-Mail Notifications To
- Allows you to include additional students or staff you also want the email sent to.
- There are four merge fields available when sending emails. They are in the Merge Tags
field.
- {$recipient_name}
- Inserts the first name and last name of the recipient
- {$recipient_first_name}
- Inserts the recipient's first name
- {$recipient_last_name}
- Inserts the recipient's last name
- {$personal_availability_link}
- Inserts the sender's Personal Availability Link (PAL)
- {$recipient_name}
Text
Texts only allow you to include a message. They are restricted to 300 characters from the standard GSM-7 character set. You can also use Content Templates for texts.
Important: Sending an email or text message to more than one student blind copies all students. In other words, the student does not know that the message was sent to more than one student. For both email and text, it looks like the message was only sent to them.
Appointment Tutorials
Availability
To enable student appointment scheduling in Ospreys Navigate, you must set up your availability. This allows students to book appointments and view your drop-in hours (office hours).
In order for your Availability to work successfully, you must have both calendar sync and availability set up, as well as have the ability to create appointment campaigns (all faculty, preceptors and select staff have this permission).
For Precepting, please see the Appointment Campaigns tab, Appointment Campaigns let faculty/staff reach out to specific student populations (preceptees) and encourage them to schedule appointments.
Set Up Email Sync for Ospreys NavigateHow to Set Up Your Availability for Meetings
How to Schedule a Zoom Meeting for your Ospreys Navigate Availability
Common Availability Questions
No. If you want students to schedule with you or ANY faculty/staff member through
Ospreys Navigate, you must have availability configured.
Calendar Sync lets Ospreys Navigate know when you are unavailable due to calendar
conflicts. It does not indicate when, where, and for what services you are available.
These are all important components of appointment scheduling.
Not if you have set up Ospreys Navigate's Calendar Sync to work with your external calendar, such as Google or Outlook. If your sync is set up, calendar conflicts added to the external calendar prevent students from scheduling during these times even if it is during an active availability.
If you haven't synced your professional calendar with Ospreys Navigate properly or recently, calendar conflicts might not be up to date in Ospreys Navigate.
Besides blocking off the break time on your Outlook calendar, you could put in your Additional Details for your Availability that “appointments will be 25 min long”, so the student would know the appointment would be from 12-12:25, for example, and then you would have a 5 minute break.
Create Availability for Students to Schedule Office Hours
To allow students to schedule appointments through your personal availability link, complete these steps:
- Sync your calendar (complete this once)
- Add availability (we recommend setting this up each semester)
- Create a recurring Zoom link for virtual availability
- Add the availability to your Personal Link
- Paste this link in your syllabus, Blackboard, or other locations
Schedule Meetings with Students
Scheduling appointments through Ospreys Navigate offers several benefits:
- Allows you to document meeting details and discussion topics
- Tracks meeting frequency
- Provides visibility into the student's support network across campus
- Shows which other campus services the student is utilizing
The system helps create a comprehensive picture of each student's academic support and engagement.
How to Schedule an Appointment on Ospreys NavigateAppointment Campaigns (Precepting Appointments)
Appointment Campaigns let faculty/staff reach out to specific student populations (preceptees) and encourage them to schedule appointments. If configured in such a manner, the system will then send reminders or 'nudges' to the students who have yet to schedule an appointment.
In order for Appointment Campaigns to work successfully, you must have both calendar sync and availability set up, as well as have the ability to create appointment campaigns. You also need to have access to Advanced Search to create a list of students for your campaign.
How to Create an Appointment CampaignHow Students Can Schedule a Campaign Appointment (Precepting Meeting)
Scheduling an Appointment on Ospreys Navigate and Connecting it to an Appointment Campaign
Common Appointment Campaign Questions
The expiration time is 11:59 PM of the specified date/12:00 AM the next day in the institution’s time zone. This means that if the expiration date specified in Ospreys Navigate is 8/24/2025 then Appointment campaign expires on 8/25/2025 at 12:00 AM.
When a student cancels a campaign appointment in advance, the Ospreys Navigate platform moves this student from the Appointments Made tab to the Appointments Not Yet Made tab. The platform also removes the canceled appointment from the advisor’s calendar so it's available to another campaign student.
Appointment Campaign links are individual to each student, so you cannot forward them.
Mark that student as no-show as you would with any other type of appointment, by unclicking the This person attended checkbox in the Appointment Summary report. These students display as “no-shows” on the Appointment Campaign dashboard. Once marked as no-show, the student can use the original appointment campaign link to schedule again within the campaign.
If the STUDENT cancels for themselves, then the link should be active again. If the appointment is canceled for the staff member in the appointment, then the link does not go back to active. This is a known issue, so make sure to encourage students to cancel their own appointments if they are unable to attend.
You should be able to associate that student’s appointment to your campaign using the Eligible Appointments tab on the Appointment Campaign page.
The Eligible Appointments tab lets you associate appointments that should be counted toward the Campaign, but were scheduled without using the Campaign link. To do this, navigate to the specific Appointment Campaign, and open the Eligible Appointments tab. Select the appointment you want to associate with the Campaign. Choose Associate Appointments from the Actions menu. The appointment is then associated with the campaign.
Note that appointments are only eligible if they have the exact same Location and Service as the Appointment Campaign. The student must also be on the campaign list.
In order to be considered an Eligible Appointment and appear on the Eligible Appointments tab, the student must be part of the campaign and their appointment must be for the same reason and location the campaign was created with, and with a staff members associated with the campaign.
Students will still receive the invitation. The platform doesn’t know to pull them out unless the advisor manually does so. It’s a good practice for advisors/preceptors to manually remove them if they already have a booked appointment for the purpose of the campaign with specific students. If the advisor/preceptor doesn’t send a clean list, they risk muddying their response rates and will have a harder time tracking the effectiveness of that particular campaign. However, an appointment will not show under the eligible appointments tab (even if the student has scheduled for the same advisor, service, and location) unless the student is also already in the campaign.
Schedule Meetings with Students
Scheduling appointments through Ospreys Navigate offers several benefits:
- Allows you to document meeting details and discussion topics
- Tracks meeting frequency
- Provides visibility into the student's support network across campus
- Shows which other campus services the student is utilizing
The system helps create a comprehensive picture of each student's academic support and engagement.
Recording Student Interactions (Meetings)
Appointment Summary Reports and Notes provide staff and faculty with the ability to record interactions with students pertaining to a specific appointment.
There are many benefits to documenting all student interactions in the platform, including:
- Creating an electronic student record that is accessible by other staff or faculty across campus
- Allowing for enhanced collaboration between those interacting with the student,
- Providing a more holistic view of how that student is navigating their college experience, and
- Allowing for robust reporting on all interactions with your students.
Any faculty or staff member can only view documentation in which they have the proper permissions, either by Care Unit or assigned students.
There are two primary documentation methods available in Ospreys Navigate:
- Appointment Summaries
- Notes
The type of student interaction dictates the appropriate method for documentation. If you are documenting a student appointment (either scheduled, walk-in, or no show), use Appointment Summary Reports. If you are uploading a document to a student profile, or leaving a general comment, use Notes.
Appointment Summary Reports
Appointment Summary Reports allow you to document information pertaining to a specific student appointment, whether the appointment was scheduled, a drop-in, or the student was a no-show. Appointment Summary Reports should only include information related to that specific appointment. Within an Appointment Summary Report, you can include the following information:
- Association with an Appointment Campaign
- Care Unit, Location, Service, and Course
- Meeting Type
- Date of Visit, Beginning and End Times
- Attendance
- Suggested Follow up
- Appointment Summary (free text)
- Responses to Care Unit-Specific Questions
- Attachments
Appointment Summaries are visable to students within their Ospreys Navigate profile.
How To Add Appointment Summaries in Ospreys NavigateStudent View: Accessing Appointment Summaries
Common Questions about Appointment Summaries
If an appointment has been scheduled through the Ospreys Navigate platform, it is important to file the Summary Report from this specific appointment in order to link them together. When you are creating a summary report for a drop-in appointment (i.e., a student appointment that was not scheduled in advance), you will need to create an ad-hoc summary report by following the instructions in this article. Creating an ad-hoc summary report will create a corresponding appointment on your calendar.
No! When you create an ad-hoc summary report, the platform creates a corresponding appointment on your calendar in the past. If you create ad-hoc summary reports for already scheduled appointments, you are essentially scheduling this appointment twice. Double-counting appointments will significantly skew the reporting data in the platform and make it more difficult to review your past appointments. If your appointment was scheduled in advance, you should only be adding Summary Reports to that appointment, rather than creating an ad-hoc report.
Yes! Any information you enter into the platform pertaining to a student becomes a part of their official student record and may be subpoenaed by that student, as outlined in the Family Educational Rights and Privacy Act (FERPA). Please consult with your Application Administrator for institution-specific guidelines about what information to include (and not include) in summary reports and notes.
No, the Suggested Follow-up field is informational only and will take no action on your calendar. Use it simply for suggested notes to yourself about when you would like to follow up with the student. You can easily view your suggested follow up dates by navigating to the “Students” tab on your staff homepage, scrolling down, and clicking on the “Recent Reports You Created” tab. This section includes all recent summary reports you filed, with a “Yes” indicated for suggested follow up – hover over the Yes to view the date. Please see the screenshot below.
Yes! Students have access to view their Appointment Summaries.
No, it will be visible to those with permissions to view the summary report, including those within your Care Unit, and including students.
Upcoming Events/Trainings
Spring Training Schedule Coming Soon! If you have any questions or need assistance in the interim, please join us for Office Hours.
Micro-training on issuing alerts and managing cases in Navigate.
Past Events/Trainings
To access trainings and recordings, please log in to your Stockton Zoom account with your goPortal credentials.
- Overview
- Calendar Sync/Availability
- Personal Links
- Overview
- Calendar Sync/Availability
- Personal Links
- Overview of Platform
- DEMO: Calendar Sync/Availability
- DEMO: Recording Interactions
- DEMO: Alerts and Cases
- Overview of Platform
- DEMO: Calendar Sync/Availability
- DEMO: Recording Interactions
- DEMO: Alerts and Cases
- Overview of Platform
- DEMO: Calendar Sync/Availability
- DEMO: Recording Interactions
- DEMO: Alerts and Cases
- Overview of Platform
- DEMO: Calendar Sync/Availability
- DEMO: Recording Interactions
- DEMO: Alerts and Cases
- Overview of Platform
- DEMO: Calendar Sync/Availability
- DEMO: Recording Interactions
- DEMO: Alerts and Cases
- Overview of Platform
- DEMO: Calendar Sync/Availability
- DEMO: Recording Interactions
- DEMO: Alerts and Cases
- Calendar Sync
- Zoom Link
- Availability/Personal Link
- Scheduling for a Student
- Calendar Sync
- Zoom Link
- Availability/Personal Link
- Scheduling for a Student
- Calendar Sync
- Zoom Link
- Availability/Personal Link
- Scheduling for a Student
- Ad Hoc Alerts
- Is it Cares or is it Navigate?
- Commenting on Cases and Assigning
- Closing Cases
- Appointment Summaries
- Notes
- Check-Ins
- Review Student Past Appointments
- Appointment Summaries
- Notes
- Check-Ins
- Review Student Past Appointments
- Appointment Summaries
- Notes
- Check-Ins
- Review Student Past Appointments
- Appointment Summaries
- Notes
- Check-Ins
- Review Student Past Appointments
- Prep- Calendar Sync & Zoom Link
- Availability
- Appointment Campaign
- Linking Appointments to a Campaign
- Prep- Calendar Sync & Zoom Link
- Availability
- Appointment Campaign
- Linking Appointments to a Campaign
General Questions & Support
Please click this form linked here to ask general questions about the "Ospreys Navigate" Student Success Platform. We will create a section on this webpage with responses to your Frequently Asked Questions.
If you need extensive support to troubleshoot an issue, please provide any screenshots of the issues you are facing and send to navigatehelp@stockton.edu for Student Affairs and OspreysNavigate-AcademicAffairs@stockton.edu for Academic Affairs. Having sufficient information will allow us to better communicate with EAB partners to receive their support.